Ginee
Ginee
 28-6-2022

If you have a Shopify store, you’ll probably want to track your Google Ads conversions to see how effective they are. This guide will assist you in setting up conversion tracking Google Ads Shopify store. Let’s check it out!
What Is Google Ads Conversion Tracking?
The Google Ads Conversion tracking tag allows you to track the number of people who took a specific action on your website, such as purchasing or signing up for an account.
Google Ads (previously known as Google AdWords) is the largest advertising platform in the world. Your Google Ads account might have multiple conversion actions Shopify on your website by providing a variety of ad formats, such as clicking on an image or link or completing a form.
Read also: 4 Step by Step to Add a Collection to a Page Shopify Store
You could, for example, create an ad offering a free consultation with your company and link it to a form where interested users can enter their phone numbers. If someone fills out the form after clicking on the ad that leads to it, Google Ads records it as a Google shopping app purchase conversion Shopify.
What Are the Benefits of Conversion Tracking for Shopify Store Owners?
It’s clear that using Google Ads advertisements generates more revenue and all conversions via click ads. If you own a Shopify store, you know how important conversion tracking is for your online marketing strategy. Benefits of Google Ads Conversion Tracking include:
- Optimize for the most effective marketing strategies for your company.
- It can assist you in optimizing your website.
- It can assist you in locating issues within your online store.
- Keep track of product views that do not result in sales.
Your Selling Stock is Messing Up? You Need Help!
Ginee Omnichannel allow you to automatically sync every stock from all of your online stores. It’s faster way to helps you profit!
Down below is a tutorial about Shopify Google Ads integration setup, here it goes:
Create Your Conversion in Google Ads
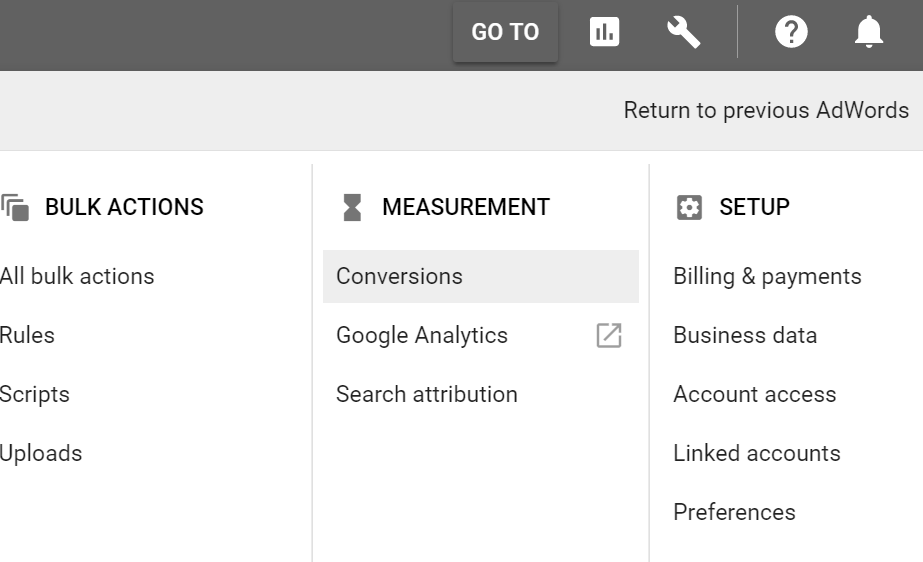
In your Google Ads account, click the spanner icon in the upper right corner. Go to “Conversions” in the “Measurement” column:
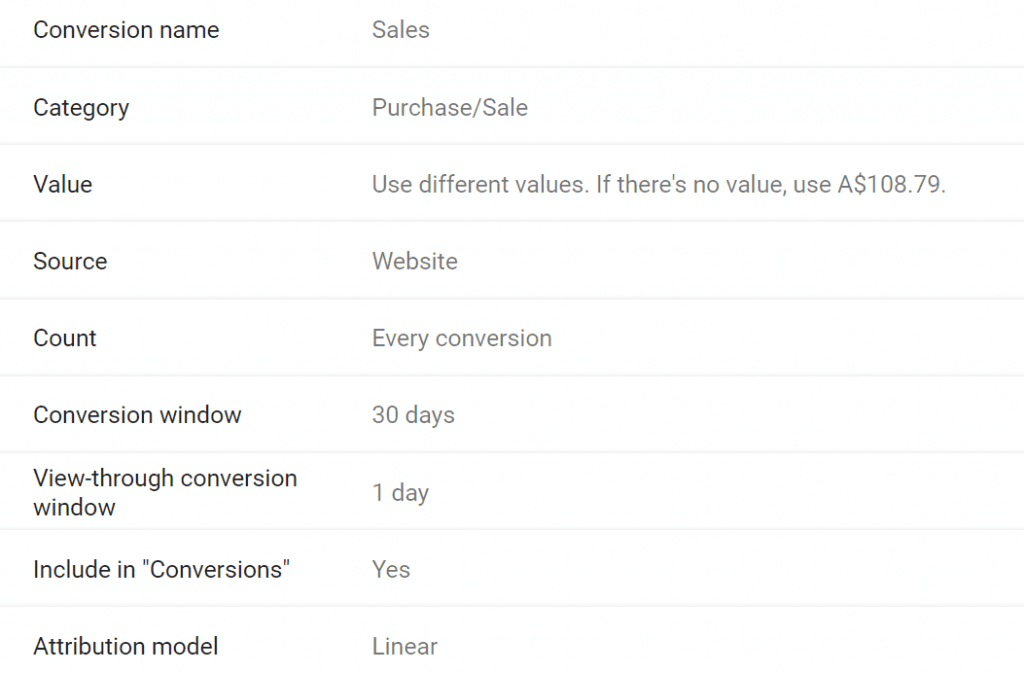
Construct a new conversion. Select “Website.” For your conversion, use the following settings:
- Name: The name can be anything you want, recommended to make it “Sales”.
- Category: “Purchase/Sale”.
- Value: Select “Use different values for each conversion” and the currency from your Shopify store.
- Count: “Everything”.
- Conversion windows: “30 days”. If your products cost more than $200 or you know your customers research products for weeks before purchasing, increase the value to “90 days”.
- View-through conversion window: “1 day”.
- Select this option: Include in Conversions Google Ads.
- Attribution: “Linear”.
Your event tag options will look like this:
Save to complete the creation of your conversion code in Google Ads. Select the “Install the tag yourself” option. For the global site tag, select “The global site tag isn’t installed on all your HTML pages.” For the event tag, select “Page load.”
To complete the setup, you will need to modify the event tag and then add the global tag and the modified event tag to your Shopify store.
Enable Enhanced Conversions
Shopify Enhanced Conversions Google Ads is a new Google Ads tracking feature that improves conversion accuracy using hashed first-party data. For better attribution, the hashed data is matched with signed-in Google accounts. This tutorial connects customer data from Shopify purchases to Google Ads accounts.
When viewing the conversion details, check the box to enable enhanced conversions:
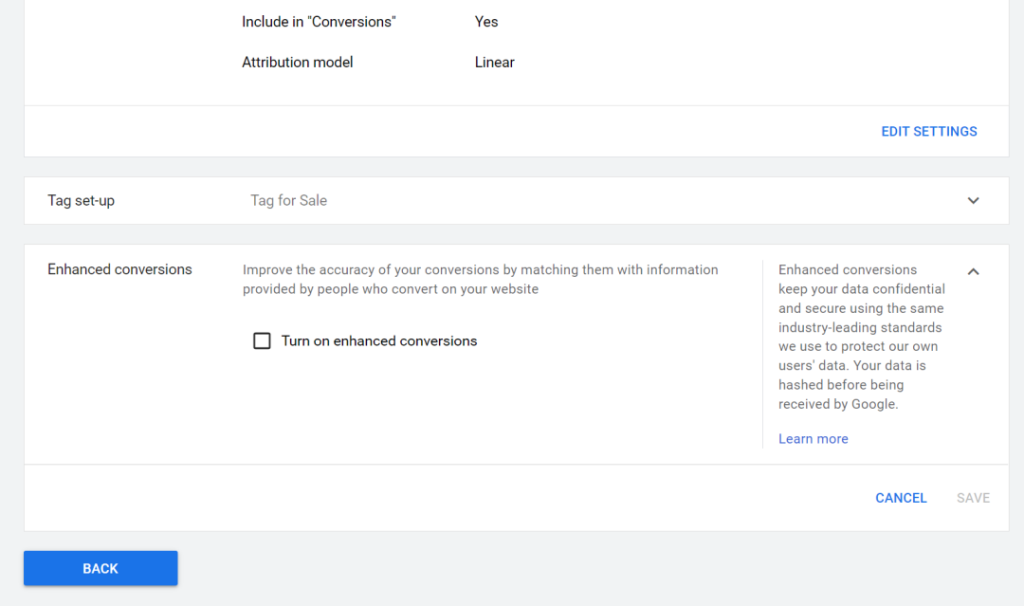
Select “Global site tag or Google Tag Manager”. Navigate to a customer order in the Shopify admin. Select “View order status page” inside the “More actions” menu. To test the URL, copy and paste it into Google Ads. You must then confirm how you want to configure enhanced conversions. Choose “Edit Code.” Save.
Read also: Where to Add Facebook Pixel Code Shopify and How? Here!
Do You Want to Manage Multiple Marketplace Just by Single Person?
Of course you can! You can handle multiple stores from all marketplace just by single dashboard. Cut your Business’s cost, and Boost your Efficiency at the same time.
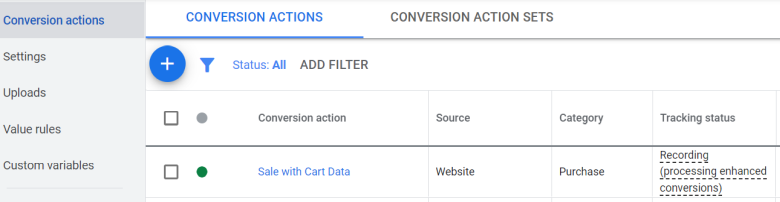
The enhanced conversion code has not yet been configured. That’s exactly what you’re about to do. When conversions arrive, the tracking status will be “Recording (processing enhanced conversions)”:
Configure the Conversion Code

The standard Google Ads event snippet for tracking that Google provides will look something like this:
| <!– Event snippet for Sales conversion page –><script> gtag(‘event’, ‘conversion’, { ‘send_to’: ‘AW-880346044/44BbCP7Vz3AQvIfkowM’, ‘value’: , ‘currency’: ‘AUD’, ‘transaction_id’: ” });</script> |
This should not be added to your Shopify store. It’s pointless. For a total body transformation, putting the standard tracking code under full anesthesia. The good news is that no technical knowledge is required.
The template code is as follows:
| <!– START Google Ads enhanced conversions and conversions with cart data by DigitalDarts.com.au v1.7.1 –>{% assign UA-ID = “UA-PROPERTY_ID” -%}{%- comment -%}Google Analytics tracking ID.{%- endcomment -%}{%- assign AW-ID = “AW-GOOGLE_CONVERSION_ID” -%}{%- comment -%}Google Ads conversion ID.{%- endcomment -%}{%- assign product-id = “product-id_variant-id” -%}{%- comment -%}The format of the product IDs in the feed. 3 accepted values “sku” (SKU of the variant e.g. aga-012), “variant-id” (variant ID e.g. 21283160948841), or “product-id_variant-id” (product ID underscore then variant ID e.g. 28541777444969_21283160948841).{%- endcomment -%}{%- assign product-id-prefix = “shopify_US_” -%}{%- comment -%}Prefix to product-id. Leave blank if there’s no prefix. This is likely needed if product-id_variant-id is selected so 28541777444969_21283160948841 becomes shopify_AU_28541777444969_21283160948841.{%- endcomment -%} {%- comment -%}Below sets variables for Google conversions with cart data.{%- endcomment -%}{%- assign send_to = “AW-XXX/XXX” -%}{%- comment -%}The send_to variable from the Google conversion code.{%- endcomment -%}{%- assign aw_merchant_id = “YYY” -%}{%- comment -%}The Google Merchant Center ID{%- endcomment -%}{%- assign aw_feed_country = “AU” -%}{%- comment -%}The country associated with the feed. Use CLDR territory codes.{%- endcomment -%}{%- assign aw_feed_language = “EN” -%}{%- comment -%}The language associated with the feed. Use ISO 639-1 language codes{%- endcomment -%} {%- comment -%}DO NOT EDIT AFTER HERE{%- endcomment -%}<!– Global site tag (gtag.js) – Google Analytics –><script async src=”https://www.googletagmanager.com/gtag/js?id={{ UA-ID }}”></script><script> window.dataLayer = window.dataLayer || []; function gtag(){dataLayer.push(arguments);} gtag(‘js’, new Date()); gtag(‘config’, ‘{{ UA-ID }}’); gtag(‘config’, ‘{{ AW-ID }}’, { ‘allow_enhanced_conversions’: true });</script> {% if first_time_accessed %}<!– START enhanced conversions –><script>var enhanced_conversion_data = { {% unless checkout.email == blank %}”email”: “{{ checkout.email }}”,{% endunless %} {% unless billing_address.phone == blank %}”phone_number”: “{{ billing_address.phone }}”,{% endunless %} {% unless billing_address.first_name == blank %}”first_name”: “{{ billing_address.first_name }}”,{% endunless %} {% unless billing_address.last_name == blank %}”last_name”: “{{ billing_address.last_name }}”,{% endunless %} “home_address”: { {% unless billing_address.street == blank %}”street”: “{{ billing_address.street }}”,{% endunless %} {% unless billing_address.city == blank %}”city”: “{{ billing_address.city }}”,{% endunless %} {% unless billing_address.province_code == blank %}”region”: “{{ billing_address.province_code }}”,{% endunless %} {% unless billing_address.zip == blank %}”postal_code”: “{{ billing_address.zip }}”,{% endunless %} {% unless billing_address.country_code == blank %}”country”: “{{ billing_address.country_code }}”{% endunless %} }};</script><!– END enhanced conversions –> <!– START conversions with cart data –><script type=”text/javascript”> gtag(‘event’, ‘purchase’, { ‘send_to’: ‘{{ send_to }}’, ‘transaction_id’: ‘{{ order.order_number }}’, ‘value’: Shopify.checkout.total_price_set.presentment_money.amount, ‘currency’: Shopify.checkout.total_price_set.presentment_money.currency_code, ‘discount’: discount(), ‘aw_merchant_id’: {{ aw_merchant_id }}, ‘aw_feed_country’: ‘{{ aw_feed_country }}’, ‘aw_feed_language’: ‘{{ aw_feed_language }}’, ‘items’: items() }); function discount(){ if (Shopify.checkout.discount == null) { return 0; } else { return Shopify.checkout.discount.amount; } } function items(){ var jsonarray = []; for (var line_item_count = 0; line_item_count < Shopify.checkout.line_items.length; line_item_count++){ var jsonobj = { id: {%- if product-id == “product-id_variant-id” -%}'{{ product-id-prefix }}’ + Shopify.checkout.line_items[line_item_count].product_id + ‘_’ + Shopify.checkout.line_items[line_item_count].variant_id{%- elsif product-id == ‘variant-id’ -%}Shopify.checkout.line_items[line_item_count].variant_id{%- elsif product-id == ‘sku’ -%}Shopify.checkout.line_items[line_item_count].sku{%- endif -%}, quantity: Shopify.checkout.line_items[line_item_count].quantity, price: Shopify.checkout.line_items[line_item_count].line_price }; jsonarray.push(jsonobj) } return jsonarray; }</script><!– END conversions with cart data –>{% endif %}<!– END Google Ads enhanced conversions and conversions with cart data by DigitalDarts.com.au v1.7.1 –> |
Add the Google Ads Conversion Code to Shopify

Access the admin area of your Shopify store. Navigate to “Settings” > “Checkout.” Paste your code into the “Order status page” and “Additional scripts” fields.
In Shopify, click “Save,” and you’re done! Within Google Ads, you will now begin receiving conversion cart data with improved conversions.
How to Test the Code

If you experienced Shopify Google Ads conversion tracking not working, you can view most of the output from the source code if you want to test it. Edit the code by adding {% if first_time_accessed %} right before the closing {% endif %} tag, then review the source code of a previous order.
Because the conversion tracking code includes the Shopify checkout object, not all values will be visible. To see what parameters are sent to the Google Ads script, you must be proficient in Chrome Developer Tools. You can also add the following code before the last </script> tag and then view the console in the browser’s developer tools to see what variables are present:
| console.log({ ‘value’: Shopify.checkout.total_price_set.presentment_money.amount, ‘currency’: Shopify.checkout.total_price_set.presentment_money.currency_code, ‘discount’: discount(), ‘items’: items()}); |
Go to the conversions section of Google Ads, click on the conversion, and then select “Webpages” from the drop-down menu to see which pages are responsible for the conversion. A report on improved conversions diagnostics is also included. So, if you ever experienced Google Ads not tracking conversions, try to test your code.
Conclusion
The Google Ads Conversion Tracking feature on Shopify allows you to track the conversion of your ads. With this Shopify integration, all you have to do is create a new campaign and select “Google” as your advertising network. Then, in the advanced options section, select “Conversion” and fill out some information about the type of conversion event you want to track.
This will enable more accurate ad performance reporting, which will ultimately help increase ROI or profit margins!
Join Ginee Philippines!
Now you know about the benefits and also the steps to track your conversion in Google Ads Shopify. But, is it hard to manage your stores by yourself? If you ever find it difficult to manage it, you can use Ginee Philippines because Ginee can help! With Ginee, you are able to manage products, stocks, orders, promotions, chats, and more in only a single dashboard. Join Ginee Philippines now FREE!
Upload Products to Shopee and Lazada Automatically! How?
Ginee product management allow you upload products to all of your online stores from all marketplace just once! Save time, save cost, save energy, join Ginee Now!