Ginee
Ginee
 23-6-2022

Wondering about where to add Facebook pixel code Shopify? Running Facebook Ads without the Facebook pixel on your Shopify store is the same as knowing where the hidden treasure chest is and not going for it. It’s just not wise.
Read also: Setting up Your Shopify Store for the First Time? Easy!
The Facebook pixel can help you boost your sales by measuring, optimising, and building targeted audiences for your ads. To make it happen, you need to add a piece of tracking code to your Shopify store.
Adding the Facebook pixel may seem a little tedious or even intimidating, though. When did the words “add some code to your website” ever sounded like a fun thing to do?
Your Selling Stock is Messing Up? You Need Help!
Ginee Omnichannel allow you to automatically sync every stock from all of your online stores. It’s faster way to helps you profit!
Why Is It Important to Add Meta Pixel to a Shopify Store?
First, with Pixel you can run ads based on detailed insights. Also, these insights allow you to view your ad performance, know how effectively the ad budget is being spent, and find what needs adjusting in the ads settings.
For example, you have created a perfect Conversion ad campaign with some considerable ad budgets. What’s next? It would be naïve to simply hope for some conversions to happen.
What would make much more sense is prioritising Shopify Facebook pixel purchase event and Shopify Facebook pixel add to cart (Shopify buy button Facebook pixel) as your main tracking, and viewing how many sales this ad campaign has driven.
It will help you understand if you should keep running this ad, adjust it or maybe change the targeted audience. To have this information, you need a “Shopify pixel” Meta Pixel on your Shopify store.
Second, you can keep in touch with online store visitors. As we at Wisely keep insisting, you should never lose a website visitor. They are just too precious: they already know about your business, are interested in what you sell, and even might have picked a product to buy from you.
It’s imperative that you keep reminding such people about your store and the items they have liked. In other words, you need to run Retargeting campaigns, which is only possible with Meta Pixel that is why some people call it Facebook Retargeting Pixel. Fantastic, isn’t it? But that’s not all.
With this tool, you can also create Lookalike audiences. These custom audiences are based on the data about the people that visited your store and help you target new potential customers.
Read also: Know 9 Basic Steps How to Use Shopify and Activate Stores
How Does the Meta Pixel Work?

As mentioned above, Meta Pixel is a snippet of code that is loaded or fired every time a person views the content on your landing page or website. To match your website visitors to Facebook/Instagram users, Facebook pixel helper tracks:
- HTTP Headers: IP addresses, web browser information, page location, document, referrer, and person using the website.
- Pixel-specific Data: Pixel ID and the Facebook Cookie.
- Button Click Data: the buttons a visitor clicks, the labels of the buttons and the pages that a visitor opens by clicking the buttons.
- Optional Values: also, you can choose to track conversion value, page type, etc. by using Custom Data events.
- Form Field Names: email, address, quantity, etc., for when a purchase is being made.
How to Add Meta Pixel to Shopify: Step-by-Step Instruction

How to add Facebook pixel to Shopify 2021 and the updated one? Having looked at the working principle of the tool, let’s answer the big question: how to install Meta Pixel on a Shopify store. Yes, it’s time to get our hands a bit dirty by doing some setting up. If you ever find that Facebook pixel not working – Shopify or how to find Facebook pixel code, you can always contact the customer service from Shopify or Facebook!
Step 1: Create a Facebook Ad Account
Before getting started with Pixel creation, make sure you are the admin of your Facebook Business Manager, a tool that helps manage ad accounts, Pages, and people who have access to them in one place. In case you don’t have an account yet, follow these steps to create one: (if you do have an account, proceed to Step 2)
Do You Want to Manage Multiple Marketplace Just by Single Person?
Of course you can! You can handle multiple stores from all marketplace just by single dashboard. Cut your Business’s cost, and Boost your Efficiency at the same time.
Read also: Try 10 Useful Tips to Use Social Media for Business Now!
- Go to Facebook Business Manager and click Create Account.
- Enter your business details and click Submit.
Step 2: Create FB Pixel
Once you have your business account, do the following in your Business Manager to create a Meta Pixel:
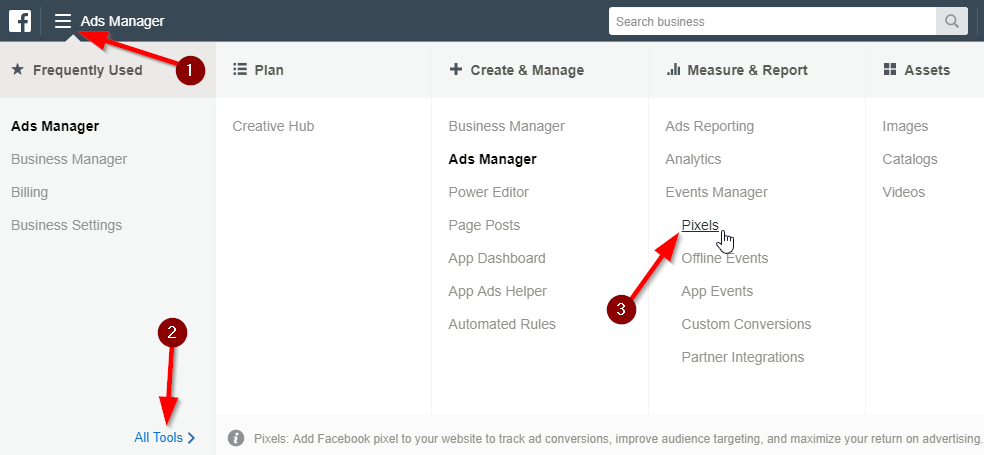
- Open Settings, then go to More Business Settings.
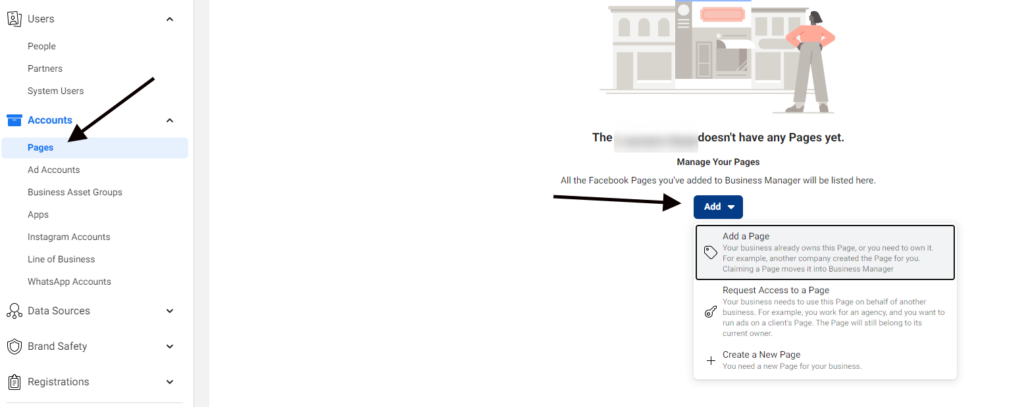
- Choose your business in the dropdown menu above and click on Data Sources.
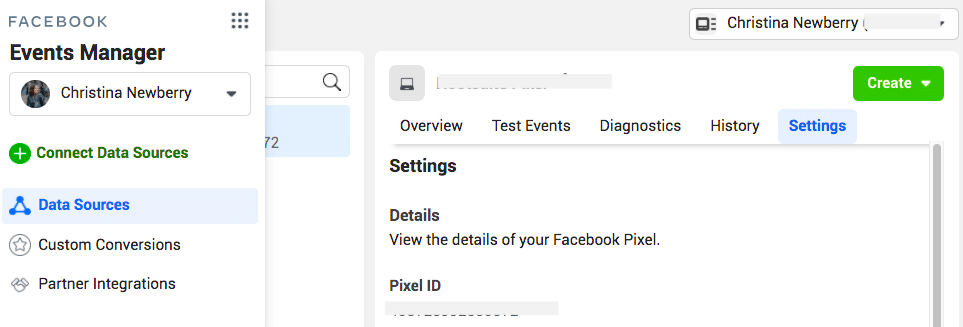
- Choose Pixels.
- Click on the Add button in the tab on the right.
- Write in the name of the Pixel to avoid possible confusion in the future. Here you can also enter the URL of your website to verify your domain name. Domain verification is an important step that allows you to effectively integrate Pixel. Remember that you can use only one Pixel for each verified domain name.
- This is the last step of creating a Meta Pixel. Next, we need to add it to your Shopify store. So click on “Set up the Pixel Now” and meet us in the next paragraph.
Step 3: Add Your Pixel ID to Shopify
Later you will be taken to your Shopify store. To add your Pixel to the store, you need to make sure your Shopify Account is connected to Facebook. Here are the instructions on how to connect Shopify to Facebook.
- To install Pixel onto a store on Shopify on Facebook, choose the first option in the menu.
- Select Shopify among the Partner options.
Step 4. Verify Meta Pixel Integration and Check If It Is Working
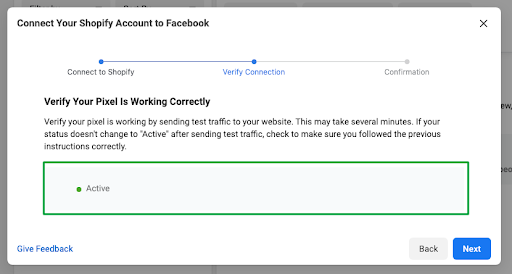
Now you need to make sure your Pixel is connected to your store. For this, in the next window, enter your domain address to verify the Pixel is working correctly and click Send test traffic. If everything is set up correctly, your status will change to Active.
Later you will see a confirmation window. From there, you can Test Events in the Event Manager, Create a new ad or go to Facebook Analytics.
That highly recommends going to Test Events in Events Manager, as you will have to select 8 standard events you want to optimise the ads for. This is an important step to target people on iOS 14 due to the App Tracking Transparency (ATT) framework.
How to Add Multiple Meta Pixels to Shopify Store
You don’t. Currently, the recommended Meta Pixel setup is one Pixel per one store domain verified on Facebook.
The 8 events prioritised for this Pixel should be more than enough for proper event tracking and ad setup. If, however, you are managing multiple Shopify stores, you can keep and manage all the Pixels for these stores in one Facebook Business Manager.
Conclusion
Meta Pixel is a piece of code that Facebook uses to track people’s activity on web stores and landing pages to later offer them more personalised ads. The Facebook pixel code example also helps store owners increase sales.
Even though the process of adding a Pixel to a Shopify store may seem confusing and intimidating at first, by following the instructions mentioned above you should be able to set it up in about half an hour or so.
Join Ginee Philippines!
If you have added Facebook pixel code Shopify, the next step is to start handling your online stores easily with the help of Ginee Philippines! With Ginee, you can manage products, stocks, orders, promotions, chats, ads campaigns in Facebook Ads or other platforms, and more. Ginee has integrated with several marketplaces and e-commerces, so you can manage online stores and reach sales faster. Join Ginee Philippines now FREE!
Upload Products to Shopee and Lazada Automatically! How?
Ginee product management allow you upload products to all of your online stores from all marketplace just once! Save time, save cost, save energy, join Ginee Now!