Ginee
Ginee
 22-7-2021
To improve efficiency of listing products to your marketplaces, you can mass publish Master Products to Shopee, Lazada, Shopify and Tokopedia stores.
IMPORTANT:
- Only applicable for accounts with activated Master Products.
*By September 22, 2021, Master Products will be activated for all accounts. - Publishing to store from the Master Products page will create a NEW product listing. This allows creation of new product listings for multiple stores at the same time.
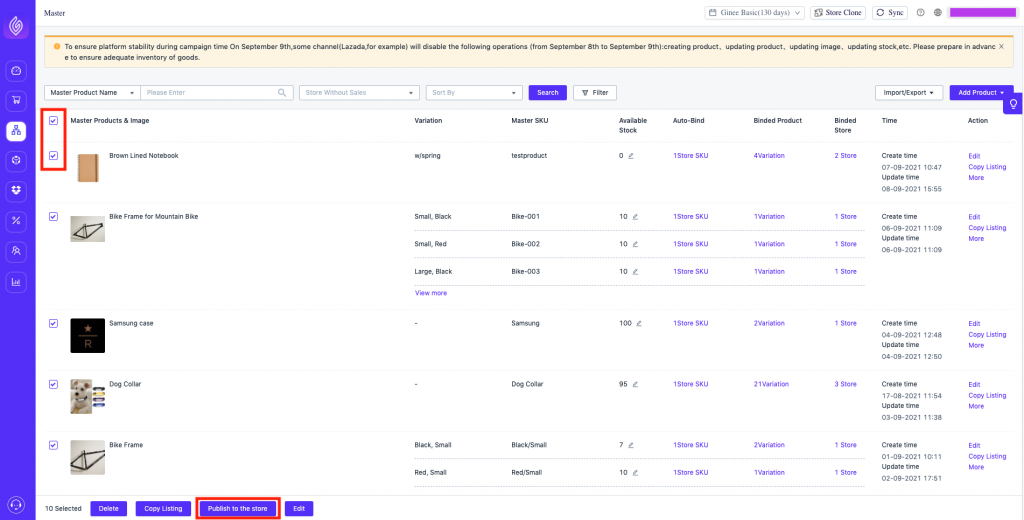
Step 1: Go to Master > Look for and choose the Master Products you want to publish > Click “Publish to Store” at the bottom of the page.
Note: You can publish up to 100 products at a time.
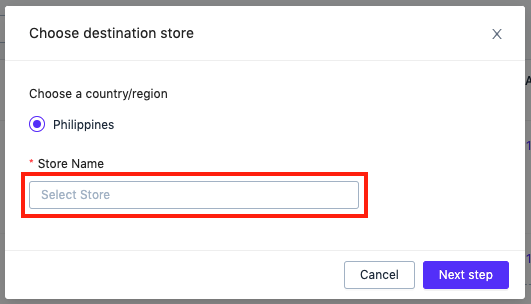
Step 2: Choose the Stores You Want to Publish the Products To
Note: Only supports same time publishing for Shopee, Lazada, Bukalapak, Tokopedia and Shopify channels.
Step 3: Fill in the Required Product Fields
Different marketplaces have different requirements for their product listings. Please fill in or edit all the required fields to ensure successful listing for all marketplaces you’ve chosen.
The required fields are the following:
- Product name
- Description (short)
- Product Description (long)
- Product Picture
- Variant Picture
- Default Price
- Available Stock
- Size (length, width, height) and weight
- Click the pencil icon at the top of the column to mass edit information in that field for ALL the chosen products.
- Click the trash can icon at the top of the column to mass delete information in that field for ALL the chosen products.
Mass editing / deletion can be done for the following fields:
- Product Picture
- Product Main Category
- Default Price
- Variant Price
- Size and Weight
- Product Status
- Minimum Purchase Quantity
Changing of currency is not supported. If the currency of the Master Product is different from the store you want to publish it to, the system will automatically convert the price based on a fixed exchange rate. If the price after conversion is lower than the minimum price allowed in the store you’re publishing to, the minimum price will be used.
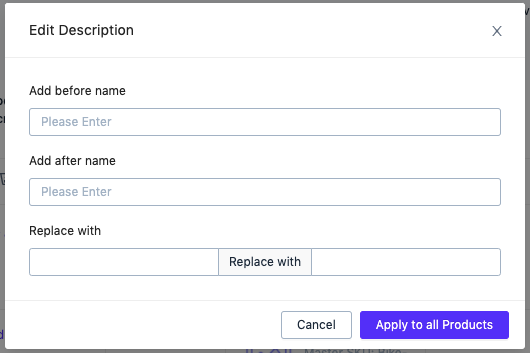
For editing of Product Name, Description (short) and Product Description (long), you can edit via:
- Add before name – adds character/s before the existing product name.
Example:
– Current Name: White T-Shirt
– Add before name: L
– New Name: L White T-Shirt - Add after name – adds character/s after the existing product name.
Example:
– Current Name: White T-Shirt
– Add after name: small
– New Name: White T-Shirt small - Replace with – replaces character/s you have inputted.
Example:
– Current Name: White T-Shirt
– Replace with: “White” replace with “Red”
– New Name: Red T-Shirt
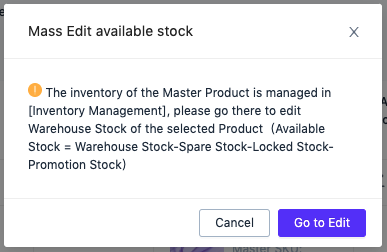
For editing of Available Stocks:
Updating of warehouse stocks must be done in Inventory Management.
- Click Go to Edit. Your Inventory Management page will open in a new tab.
- Choose the items you want to restock then click Edit Warehouse Stock. Update the stock movement then click Confirm.
(Note: this is done per product) - You can also update your stocks by downloading the Update Warehouse Stock template, fill in the information needed and upload.
Note: Please refresh the Master Products page to see the updated Available Stocks.
After editing all fields, click Save and Next.
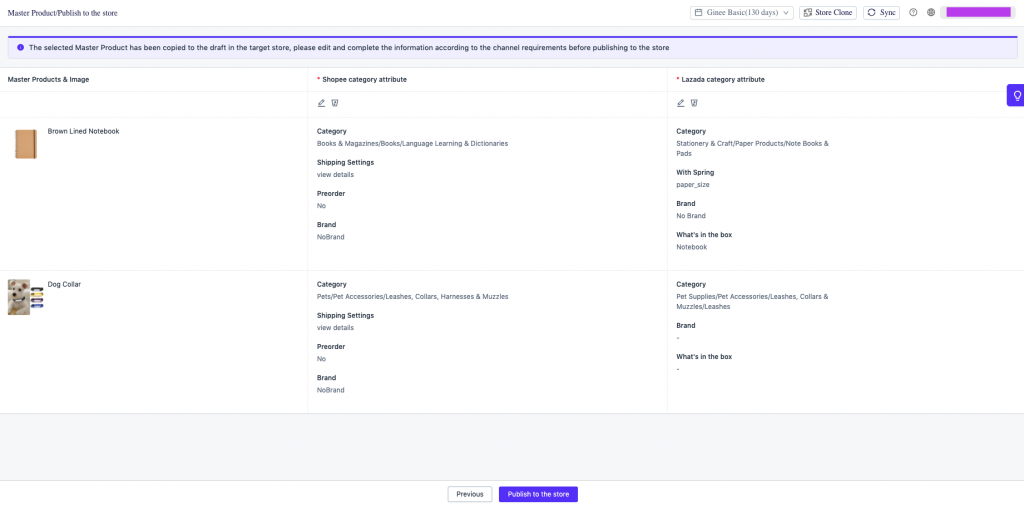
Step 4: Mass Edit Channel Products by Channel Dimension
After clicking Save and Next, you will see a page showing specific fields per channel that you will need to check or fill in. This is because each channel has different required product fields.
Please fill in to ensure successful publishing to the specific channels. Below are the required fields per channel:
- Shopee:
a. Category
b. Logistic Option
c. Pre-Sale
d. Brand
2. Lazada
a. Category
b. Pre-Sale
c. Variant Type
d. Package Content (What’s in the box)
3. Bukalapak
a. Category
b. Pre-Sale
4. Tokopedia
a. Category
b. Pre-Sale
c. Variant Type
Notes:
- If the Master Product you’re publishing has the same name as an existing product in the store you’re publishing to, the publish will fail.
- If you cancel the publishing of the product, it will go to the specific channel’s Drafts.
Step 5: Click Publish to Store
Once you’ve clicked Publish to Store, you will see publish status (success or failed).

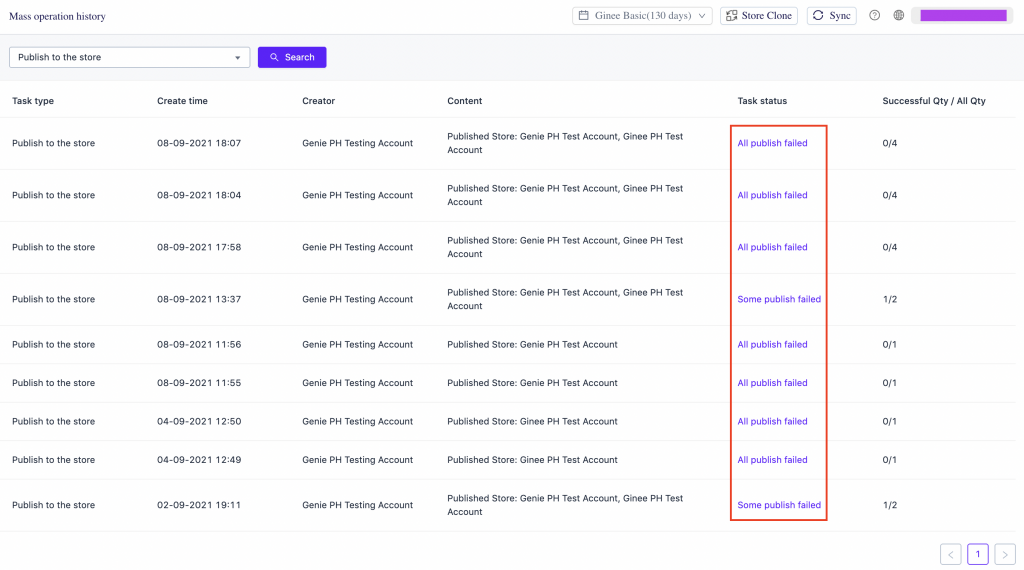
Viewing of Mass Operation Records
You will be able to check the history of Mass Publish to Store actions for the past 7 days.
Go to Master > Import / Export > Mass Operation Record.
After, you will see the status of each Mass Publish to Store action you have done.