Ginee
Ginee
 29-5-2022

How to send invoice to customer Shopify? What’s an order if there’s no invoice to take customers to their checkout page, right? It sounds easy, but it’s far from it. When you first started out with your online store on Shopify, the Shopify “send invoice” part was always where you got stuck. Check out this article of how to send invoice and to optimize your store!
It seriously took a long time to get used to it with all the Shopify policies, and even then, you always wished there was a straightforward way to get it done.
Read also: How to Get Shopify Invoice and What Are the Examples?
You later found out that there are actually tools to get the invoicing party done in a blink of an eye. And many research found you can ue businesses’ invoices LessAccounting’s Shopify invoice template app if you ever confused of how to do Shopify edit invoice template.
Your Selling Stock is Messing Up? You Need Help!
Ginee Omnichannel allow you to automatically sync every stock from all of your online stores. It’s faster way to helps you profit!
If you relate to what you are saying, your hassle ends here. Because I’ve been in your shoes before and I know that the struggle is real, I decided to share with you a how-to on sending an invoice on Shopify so that you could start reaping the benefits of your sales hassle-free and with minimal Shopify admin work!
This method is very straightforward. All you’ll need to do after installing the app and signing in is to click on the Invoices tab, which you can find on the menu bar on the left. When you do so, you’ll be presented with a list of your Shopify store orders. Go ahead and search for the order you want, either by date or financial status.
If you’re not sure about those details, you could alternatively keep scrolling through the pages and using the “back” and “front” keys towards the bottom of the page. Once you’ve found your order, you’ll find a button with a mail icon on it (next to the row with the order name on the right).
Another method is again through the “Invoices” tab. However, this time, when you’re presented with the list of your Shopify store’s orders and choose the order, you’ll click on the blue highlighted order name instead of the mail icon.
Once you do, the invoice with the order information will be generated, and you’ll be redirected to the “Invoice Preview” page in case you want to review the email invoice and the order details before sending it. Once the information is ready, click on “send” and choose how you’d like to send the invoice to the customer.
By choosing “send now,” the invoice will be sent by email to the email address specified in the customer profile. In contrast, if you choose “review & send,” you’ll be able to add additional email addresses to share the invoice with, send a copy of the invoice to yourself, and even change the email subject & body before sending the invoices of the orders.
Also, if you want to send a Stripe payment link embedded in the email, that’s possible with a Stripe account along with an Ultimate subscription.
What are draft orders in Shopify? The orders that you create on behalf of your customers are named draft orders. Draft orders are similar to the orders that your customers create for themselves. A draft order is converted to an order when you accept payment for it.
Last but not least, you’ll find an option relating to turning payment reminders on and off. If you turn it on, LessAccounting will automatically check the order’s payment status and send reminder emails to your clients until they make the payment. This can also be the way to Shopify send invoice automatically.
The last method is through the actual Shopify platform. On your dashboard, you simply click on “Orders” and then click on the one you’d like to send an invoice for. You’ll then be redirected to the Order details page on the dashboard, where you’ll click “Actions.” Following that, click on “Send or Print Invoices,” a blue icon below the order name.
Once you do, you’ll find yourself back to the Invoice Preview page on our app. Like the previous method, the invoice for your customer will be generated, and you’ll be able to review it before it’s sent. Once you’re ready, click “Send” and choose the most convenient way for you to send the invoice to your customer. Just like that, you’ll be all done!
Shopify invoice is a document, sent by the seller to the customer, that requests payment for products or services. Similar to a bill, it lists what goods or services were provided, how much they cost and which forms of payment the seller accepts.
Invoices are typically issued to a customer after they have received their goods or services, but before payment has been received.
From sending email reminders to customers to integrating Stripe links in the email invoice, you’ll be impressed with this comprehensive solution. Let’s get right into it.
Read also: Setting up Your Shopify Store for the First Time? Easy!
Step 1: Go to the Draft order
From your Shopify admin screen, you can see the Order button on your left-hand side, click on it and select the Draft section to see the draft orders.
Step 2: Go to the Email Invoice
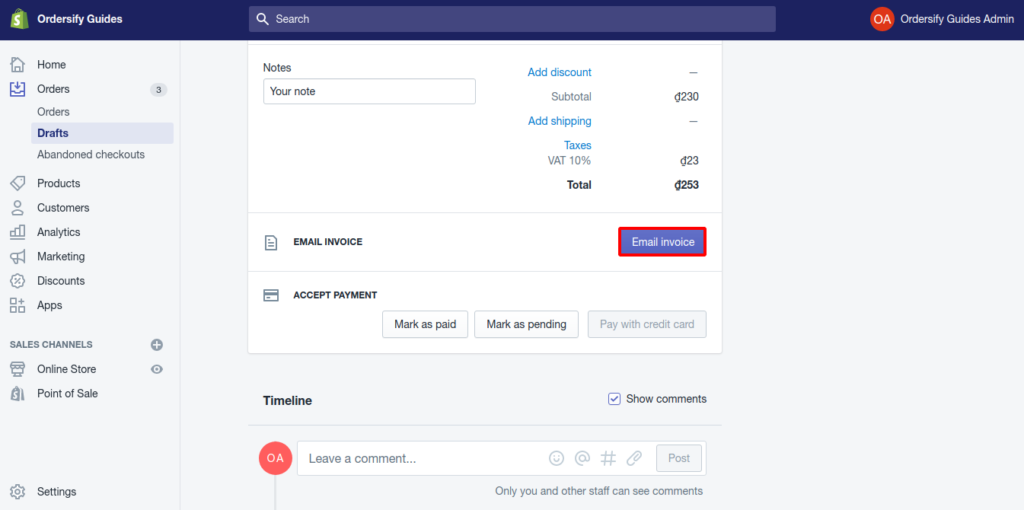
In the Draft page, you can see all the draft orders, choose a draft order you want and click on it to go to the Order details section. From the Order details area, click on the blue button named Email invoice.
Do You Want to Manage Multiple Marketplace Just by Single Person?
Of course you can! You can handle multiple stores from all marketplace just by single dashboard. Cut your Business’s cost, and Boost your Efficiency at the same time.
Step 3: Enter the Message
A dialog box called Send invoice will pop out. In this dialog, fill in your message for that customer in the Custom message for this customer field.
Step 4: Check Your Email
After you finished the previous step, hit the Review email to check your email.
Step 5: Email the Invoice
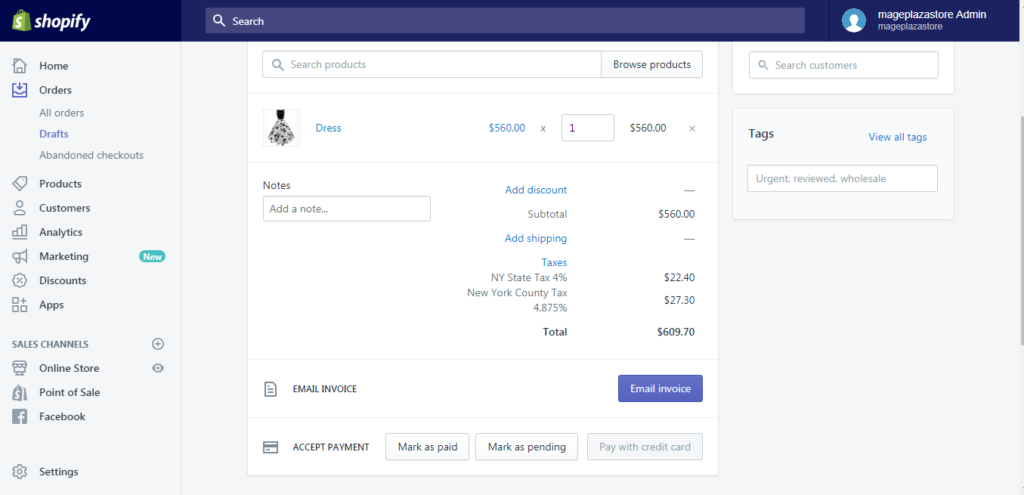
When you finished your checking, hit Send notification and your work is done. You can also do the ways of how to download invoice from Shopify.
Read also: What Happens If I Close My Shopify Store? Charged or Not?
Conclusion
The checkout process is easy and straightforward for customers, but for business owners, it’s not exactly a walk in the park. To be precise, it wasn’t, but that was before that was able to send invoices so seamlessly. You no longer have to worry when orders are placed, and that’s all thanks to LessAccounting’s Shopify invoice app.
The best part is that if one method seems like too much work, you have options and features that you could play around with to get your invoices done.
Just by following the very straightforward steps in the guide above, your customers will receive their receipts or invoices, fill in their contact information and payment methods, and their draft orders will be converted to official ones. What if draft order payable via customer checkout not working or the Shopify draft order API is not available? You can try to consult to Shopify customer service!
Join Ginee Philippines!
After sending invoice to customer in Shopify, next thing to do is to optimize your online stores in Shopify by using Ginee Philippines! Ginee is an Omnichannel that can help you manage your products, stocks, orders, promotions, chats, ads campaigns, and more in only a single dashboard. Join Ginee Philippines freely now!
Upload Products to Shopee and Lazada Automatically! How?
Ginee product management allow you upload products to all of your online stores from all marketplace just once! Save time, save cost, save energy, join Ginee Now!