Ginee
Ginee
 14-9-2021

In order to really succeed in the extremely competitive online marketplace, you need to do more than just generate revenue. You also need to learn skills and step-up your tools in a way that’ll prepare your online store for growth. And one of the most essential ways to do so is to start with the basics and step up the way you upload your products through Mass Update Shopee.
How to Upload Products on Shopee Philippines?
As an up and coming merchant, one of the most basic and most important things you need to learn is how to upload your products to your online store. I mean, without your products on the platform how can you start selling?
You can access your account and the Seller center using your login information. To your left of your screen you’ll notice a “My Products,” option. Click it.
Once there, you’ll need to select the “+Add a New Product” button which will then redirect you to a page with the listing of all your products.
Then you’ll have to fill up and provide the necessary information of your product such as the product name, category, type of product, and specific product classification. You’ll also need to make sure the information you provide is complete and accurate.
It’s also important that you provide good and real pictures of your products to show your customers what they’re going to buy. If you can provide good, professional quality pictures of your products, even better!
The last thing you’ll need to take care of are the shipping details for your products. You’ll need to handle things like the weight of the package, its size, and its corresponding shipping fee details with the courier, which you will also have to choose. Your choices for courier include GoGo Express and J&T express.
In the event that you failed to update product Shopee, simply try the process again or try other fixes like making sure your Shopee update app is up to date or contacting Shopee’s Support team.
See also: How to Upload Products in Shopee
Do You Want to Manage Multiple Marketplace Just by Single Person?
Of course you can! You can handle multiple stores from all marketplace just by single dashboard. Cut your Business’s cost, and Boost your Efficiency at the same time.
How to Mass Upload Products in Shopee Philippines?
For merchants really trying to step up their business, you’ll need to know how to Mass Upload your products. Being able to do so allows you to quickly and effectively improve your business processes and will help you become the best seller you can be.
In terms of the Mass Upload meaning, it is a function that enables vendors to submit multiple listings on the platform to a store all at once. Shopee Seller Centre users can use this option to save time when posting a large number of listings.
On actually starting to use the Mass Upload function, there are four general steps that you’ll need to do to set it up. This includes Generating and Downloading your Template, Filling up the Template, Uploading the template, and Filling in your Attributes and Publishing the Projects
Generating & Downloading Your Template
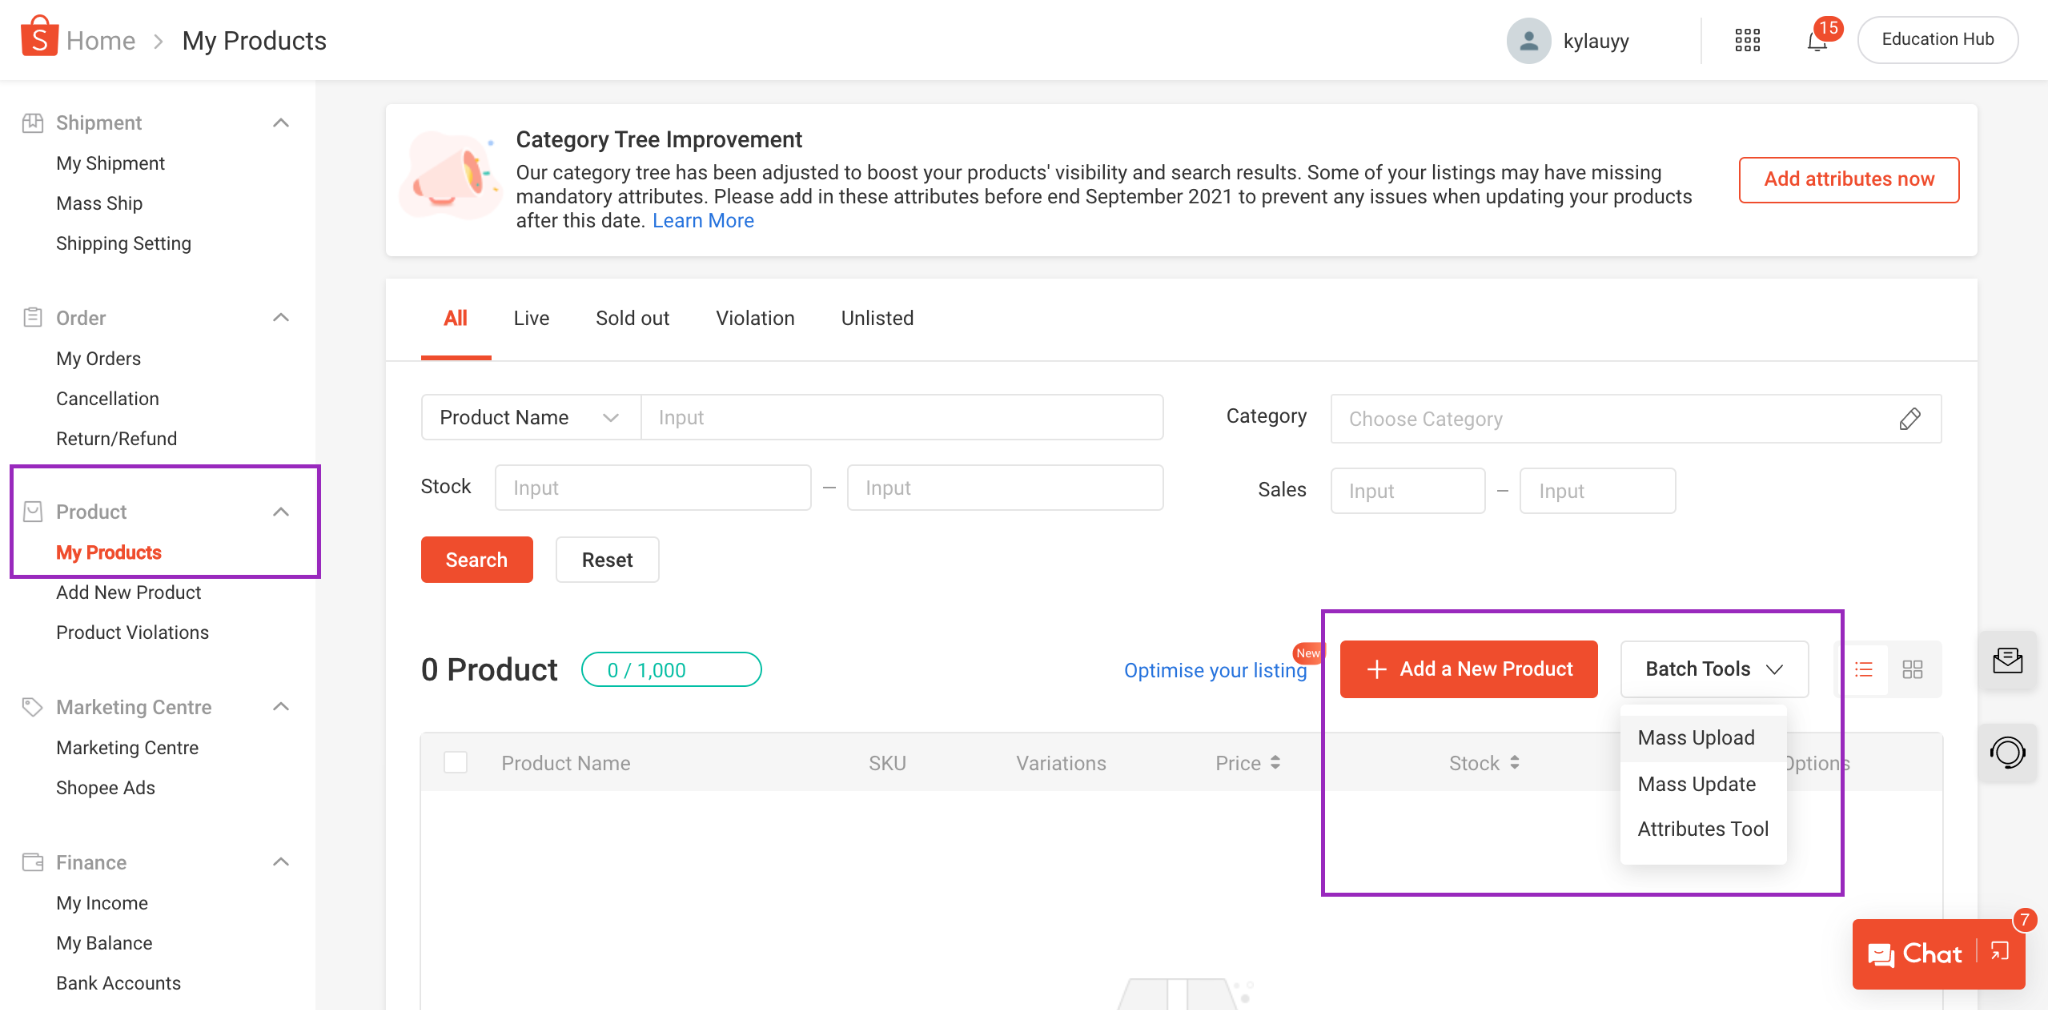
To start this, you’ll need to go back to your “My Products” page then select the dropdown list called “Batch Tools” then select “Mass Upload.”
Once that’s done, you’ll simply have to select the “Download” button on the “basic template” and once the file is downloaded you’ll need to open it using your preferred spreadsheet software like Microsoft Excel.
Fill up the Template with the Necessary Information

On the file you downloaded on the previous step, you now need to fill it up with the required information. When you open the file on Microsoft Excel, it’ll open in protected view so you’ll need to select the “Enable Editing” option so that you can start filling up the template.
The first four rows are used to define if each column is mandatory to fill up or if the column is optional, what the column is for, and what must be provided to fill it in. You must not change nor edit these rows. You’ll be filling up the required information from the fifth row onwards, and each specific product you’ll be adding should have its own row. So if you’re adding 20 specific products, you’ll be adding 20 new rows from the fifth row onwards.
If your products have variations, you’ll also need to take note that you’ll need to do some additional things in order to successfully upload these products. You’ll first need to note whether the product has a 1-tier structure or a 2-tier structure.
1-tier structure products are those that only have one variation type like size. For these types of products you’ll have to fill up the “Variation Name 1 and “Option for Variation 1” columns. Furthermore, there should be one record for each distinct variation option but must still have the same Variation Integration Number.
2-tier structure products are products that offer two variation types like a product offering variations depending on size and color. For these products, you’ll need to fill in both the “Variation Name2” and “Option for Variation 2” columns as well as the “Variation Name 1 and “Option for Variation 1” columns. All variations of a product must have their own record and must have the same Variation Integration number.
Once the template has been fully filled up, save your changes to the file and then you are ready to upload.
Upload & Check the Results of Your Upload
Going back to the page of the Mass Upload Tool, select the “Upload File” tab. Then, click the “select file” option and select your filled-in template. Once that’s done you should be ready to proceed to the next step.
In the case of a failed upload, you’ll see it on the “Records” on the bottom of the “Upload File” tab. On there, you can see each of your attempted uploads, the status of the upload, and you can download the file whose upload failed. Download the failed file so that you can see why the upload failed.
Your Selling Stock is Messing Up? You Need Help!
Ginee Omnichannel allow you to automatically sync every stock from all of your online stores. It’s faster way to helps you profit!
Fill in Attributes & Publish the Projects
After a successful upload, click the “Mass Update Attributes” button then go to the “Attributes Tool” page. Once there, make sure that you are on the “Unpublished Items” tab then look at the items under “All Product Information.” While there you’ll see a table with three columns, those being “Product Details”, “Category”, and “Attributes/DTS values” respectively. Then the products you added to your template can be seen on each of the rows below.
For each of your products you’ll first need to fill in all the required attributes on the third column. Then make sure each of your product’s images are correct, select the image under the first column to edit them. Then also on the first column, check if each of your products’ Parent SKU are complete and correct, simply click it to edit.
Once everything is ready, click the small box next to the first column for each product listing that you’re ready to publish. Once all your listings have been selected, simply click the “Publish” button at the bottom right of the page and you’re done!
Ginee to Step Up Your Shopee Game
With this article, you’re probably more than well-equipped to answer the question “how to upload in Shopee.”And with that you’re another step closer towards optimizing your online store. To go even further, you’ll eventually need to learn about how to master the Shopee category tree or make use of the chat assistant Shopee features. Beyond this though, your best bet to really make an efficient and successful business is Ginee Philippines.
With more than 50,000 clients all over the continent of Asia, Ginee provides businesses powerful business tools to help online entrepreneurs realize their potential. So to really help secure your success online, what are you waiting for? Sign up today and start your free trial today!
Upload Products to Shopee and Lazada Automatically! How?
Ginee product management allow you upload products to all of your online stores from all marketplace just once! Save time, save cost, save energy, join Ginee Now!